
When you press the brake pedal, you are applying force to a lever system connected to the vehicle’s braking mechanism. In older or basic systems, this force is transferred mechanically through linkages that help engage the brakes at each wheel.
Brake Pedal Components You Should Know
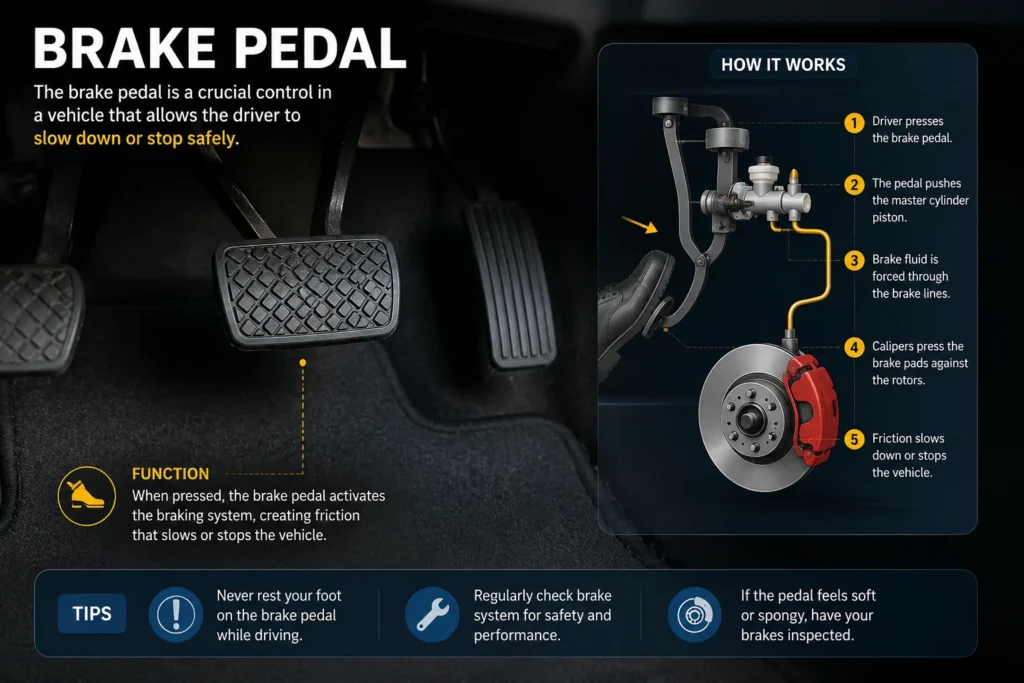
The brake pedal system is made up of several important parts that work together to ensure safe and effective braking.
Pedal Arm
The lever you press with your foot, which transfers force into the braking system.
Brake Booster
Helps amplify that force so you don’t need to apply excessive pressure while driving.
Master Cylinder Connection
Converts mechanical force into hydraulic pressure, sending brake fluid through the brake lines to engage the brakes at each wheel.
Return Spring
Ensures the pedal moves back to its original position after being released, maintaining proper control and feel.
Position Sensor
Included in modern vehicles to detect how far and how fast the pedal is pressed, sending this data to the vehicle’s ECU for advanced braking functions like ABS and electronic brake distribution.
Common Brake Pedal Problems and Symptoms
Brake pedal issues often indicate problems within the braking system and should never be ignored.
Soft or Spongy Brake Pedal
Usually means there is air in the brake lines or a brake fluid leak, reducing braking efficiency.
Brake Pedal Feels Too Hard
May be due to a failing brake booster or vacuum supply issue, making it difficult to apply normal braking force.
Brake Pedal Goes to the Floor
Often signals a serious hydraulic failure such as low brake fluid or a damaged master cylinder.
Brake Pedal Vibration or Shaking
Can be caused by warped brake rotors or uneven brake pad wear, affecting smooth stopping.
Brake Pedal Stuck or Returns Slowly
May be due to a faulty return spring, contaminated components, or mechanical binding in the pedal assembly, all of which require immediate inspection.
What Causes Brake Pedal Failure?
Brake pedal failure can happen due to several mechanical or hydraulic issues within the braking system. Some of the most common underlying causes include:
Brake Fluid Leaks
One of the most common causes is brake fluid leaks, which reduce hydraulic pressure and make it harder for the system to engage the brakes properly.
Air in the Brake Lines
Air in the brake lines can also lead to poor braking performance because air compresses under pressure, creating a weak or spongy pedal feel.
A Worn Brake Booster
A worn brake booster may fail to amplify the force from your foot, resulting in a very hard brake pedal that requires extra effort to press.
Faulty Master Cylinders
Faulty master cylinders are another major cause, as they are responsible for generating hydraulic pressure—any internal damage can lead to a loss of braking power.
Sensor or Electronic Failures
In modern vehicles, sensor or electronic failures in the brake-by-wire system can also disrupt communication with the ECU, leading to inconsistent or unresponsive braking behavior.
Brake Pedal Replacement – Step-by-Step
Replacing a brake pedal or its related assembly requires careful attention because it is directly linked to the vehicle’s safety system.
Preparation & Tools
Before starting, make sure you have the right tools such as wrenches, screwdrivers, pliers, a jack (if needed), and safety gloves.
Safety Precautions
Safety precautions are very important—disconnect the battery, ensure the vehicle is parked on a flat surface, and avoid working on the brake hydraulic system unless you are properly trained.
The Removal Process
The removal process typically involves detaching the lower dashboard panel, disconnecting the brake light switch and position sensor (if present), and unbolting the pedal arm from the mounting bracket and booster connection.
Installation
For installation, the new brake pedal assembly is aligned and securely bolted into place, then all connections including the return spring, master cylinder linkage, and sensors are reattached properly.
Essential Testing
After installation, testing is essential—press the pedal several times to check firmness, ensure smooth return action, verify brake lights function correctly, and confirm that braking response is normal before driving the vehicle.
Brake Pedal Replacement Cost (2026 Updated Guide)
The cost of replacing a brake pedal or related assembly in 2026 can vary depending on labor rates, part quality, and vehicle type.
Labor Rates
On average, labor costs range from moderate to high because the job often involves dashboard disassembly and brake system calibration. In most cases, labor alone can cost significantly more than the part itself due to the precision and safety requirements involved.
Part Quality (OEM vs. Aftermarket)
OEM (Original Equipment Manufacturer) parts are generally more expensive but offer better reliability and perfect compatibility, while aftermarket parts are more affordable but may vary in quality and durability.
Vehicle Type
Vehicle type also plays a major role in pricing—standard sedans are usually cheaper to repair, while SUVs, luxury cars, and vehicles with electronic brake-by-wire systems tend to cost more due to advanced components and additional calibration requirements.
Brake Pedal Adjustment and Maintenance
Brake pedal adjustment and regular maintenance are important for ensuring safe, responsive braking and preventing long-term system damage. Proper care helps maintain consistent pedal feel and improves overall driving safety.
How to Adjust Pedal Height
Brake pedal height adjustment is usually done by modifying the pushrod connected to the brake booster or master cylinder. By turning the adjustment nut or rod, the pedal position can be raised or lowered to match factory specifications. The goal is to ensure the pedal sits at a comfortable height and engages the brakes without excessive travel. After adjustment, it’s important to check free play and confirm that the brakes fully release when the pedal is not pressed.
Brake Fluid Maintenance Schedule
Brake fluid should be checked regularly and replaced according to the manufacturer’s recommended schedule, typically every 2 to 3 years. Over time, brake fluid absorbs moisture, which reduces its effectiveness and can lead to corrosion inside the braking system. Maintaining clean, high-quality brake fluid ensures proper hydraulic pressure and consistent braking performance.
Frequently Asked Questions (FAQ)
Why does my brake pedal feel hard?
A hard brake pedal usually happens when the brake booster is not working properly or there is a problem with the vacuum supply. Since the booster helps amplify your foot pressure, any failure in this system makes the pedal difficult to press and reduces braking efficiency.
Can I drive with a soft brake pedal?
Driving with a soft or spongy brake pedal is not safe. It often indicates air in the brake lines, low brake fluid, or a leak in the hydraulic system. These issues can lead to reduced braking power or complete brake failure if not fixed immediately.
How long does a brake pedal last?
The brake pedal itself can last for the lifetime of the vehicle, but related components like the brake booster, master cylinder, springs, or sensors may wear out over time. With proper maintenance, these parts can last many years before needing replacement.
Is brake pedal replacement difficult?
Yes, brake pedal replacement can be moderately difficult because it involves working under the dashboard and disconnecting mechanical, hydraulic, and electronic connections. In most modern vehicles, it is recommended to have a professional mechanic handle the replacement to ensure safety and proper calibration.